脚本适用环境:
系统支持:CentOS6+,Debian7+,Ubuntu12+
内存要求:≥128M
使用方法:
root用户登录后,运行以下命令:
执行后,会有如下交互界面: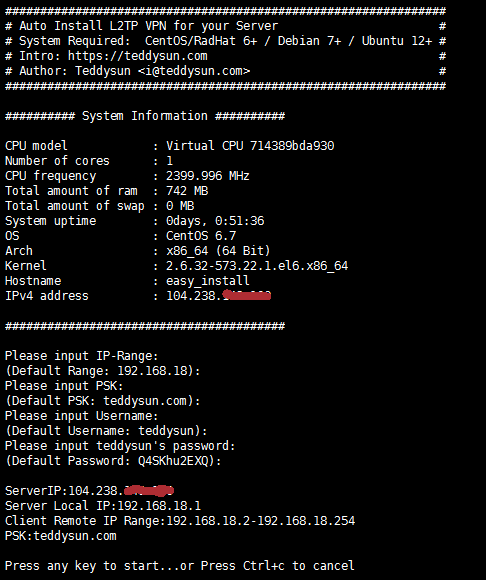
按下任意按键继续,如果想取消安装,请按Ctrl+c键。
安装完成后,脚本会执行 ipsec verify 命令并提示如下:
如果你要想对用户进行操作,可以使用如下命令:
l2tp -a 新增用户
l2tp -d 删除用户
l2tp -m 修改现有的用户的密码
l2tp -l 列出所有用户名和密码
l2tp -h 列出帮助信息
其他事项:
1.脚本在安装完成后,已自动启动进程,并加入了开机自启动。
2.脚本会改写 iptables 或 firewalld 的规则。
3.脚本安装时,会即时将安装日志写到 /root/l2tp.log 文件里,如果你安装失败,可以通过此文件来寻找错误信息。
使用命令:
ipsec status (查看 IPSec 运行状态)
ipsec verify (查看 IPSec 检查结果)
/etc/init.d/ipsec start|stop|restart|status (CentOS6 下使用)
/etc/init.d/xl2tpd start|stop|restart (CentOS6 下使用)
systemctl start|stop|restart|status ipsec (CentOS7 下使用)
systemctl start|stop|restart xl2tpd (CentOS7 下使用)
service ipsec start|stop|restart|status (Debian/Ubuntu 下使用)
service xl2tpd start|stop|restart (Debian/Ubuntu 下使用)
转自:秋水逸冰的博客
https://teddysun.com/448.html